Saturday, December 27, 2008

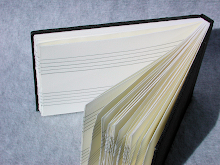
lined paper

I differentiate books as journals being lined and sketchbooks being unlined. Using this terminology I think there are many sketchbooks that wish they were journals, but lineage was not available. Lined book blocks and paper are available, but that smart handmade paper that you really like is rarely going to be lined. For this reason I have been lining my own paper. I have the option to draw, print, or emboss the lines, and I can decide the color, gauge, and spacing of the lines.

Any printing method works. I have used etching, aquatint, and lithography. I haven't used screen printing or wood/lino cut. One of my favorite results was from a frame wrapped with mono filament fishing line. The fishing line leaves the printed line as well as a light score in the paper.

When drawing lines I set up a template with marks for line spacing. I place a rule at the appropriate mark and follow the straight edge very closely without touching the rule. This is my personal technique for making a very straight line that still has a looser hand drawn feel. I've also projected the lines with a digital projector and traced the lines.
Whether drawing or printing I set up my template or printing plate so that the length of the paper is at least two signatures long. I make the lines on both sides of the paper then tear the sheet at signature length. Picture a toilet paper roll with lines running the length of the sheet and then tear off signatures as required. That is an exaggerated picture. Most of my prints and drawings tear down to give me two signatures. The matchbook size I get four to six signatures.

Sometimes when printing I'll get four signatures from one plate by drawing my plate so that the top and bottom of the plate are the tops of two signatures. The center line of the plate is the bottoms of the signatures. After printing both sides of the sheet, tear once length wise to get two double length signature sheets then tear those down to single signature length. Confusing description I'm sure. Using the image below. Picture it as two plates each large enough to make two signatures. The top plate is right side up and the bottom plate has the signature tops at the bottom. But instead of two separate plates make it one plate to print one large sheet that is then torn down to four pieces.
Hmm, not sure if that's any better. Maybe there is still something usable here.

Thursday, December 25, 2008

printing hardware, improvised

I had a conversation with Meredeth of Yatsu fame from the etsy bookbinding group. The conversation lead to talk about printing and producing lines in a homemade, handmade, self-help fashion. I've spent the last five years around presses and have been making my own lined paper, so maybe now is the time for me to expand on the topic a wee bit.
I'll start with the press. When I hear people lamenting over not having a press, one of my first comments is--Make one. Bookbinding is already about taking the long route to getting a book or journal, so why not dig the hole deeper. Books are about multiples whether it is duplication within the contents of a book or duplication of information between books. The press is also about duplication. So don't let not having a press be an obstacle. I'm mostly speaking to the people who have a print related idea but think they are stuck since they don't have a press.

I won't go too much into using a wooden spoon. I haven't had much luck with the technique (mostly because of my application), but do remember that it is an option.

The mechanics of the press is basically the idea that anything that will exert pressure can be used for printing to some degree of success. The photo in my article about adjusting photographs is a picture of several wood presses that work well for letterpress and block-type printing. Notice the resemblence to clamps?

To cover the actual construction and printing techniques would involve writing a book which is not my objective today. This is a primer. The internet is loaded with homemade printing press plans. All seem to be variations of similar ideas. One of the older how-to-build-an-improvised-press books is a Popular Mechanics book published in the 1960's (I think). I can picture where it was shelved in the universitiy's technical library, but I can't find it in the catalogue. Anyway, the technical library usually has something on improvised presses if the school has some sort of printmaking program. The key to remember is that for etching and litho printing some sort of roller or scraper bar needs to be incorporated into the press to concentrate the necessary pressure to transfer an image. Materials are easily found. Plywood, and standard hardware. The roller can be salvaged or found at tinkerer suppliers like American Science and Surplus (this store is a gem in and of itself).

When I began my quest to build a litho press, some printers told me it was impossible to build something out of wood that would create the required pressure. I remembered seeing one of Gutenberg's original presses, and it was made from wood. Sennefelder, the inventer of lithography, made a suitcase-sized, portable press made from wood. I was looking for a certain look when I built my press, so I used solid maple. If function is the only objective, plywood should work nicely--it's lighter weight too.

Pictured is my press and the resulting print. Everything is wood except for the leather on the scraper bar and the plexiglas for the tympan. The litho stone is local limestone from a landscaping supplier.
A much simpler press can be built much more easily if function is the only concern. I took the extra trouble with this press to prove that it could be done.

Saturday, December 13, 2008

prototype

This series of images should be self explanatory if you begin with the idea of a box for storing supplies and progress to a cradle for everything a cradle is used for. The cradle/box is a prototype, so it is short on embellishments like handles, latches, pulls, and interior dividers. It is one of a kind and the precursor to a series. The construction is masonite and glue with strategically located slots to allow it to do what it does. Dimensions are approximately 3.75 x 11.75 x 9.5 inches closed, and when opened the cradle handles standard 8.5 x 11 sheets folded in half.
Note that the bottom of the cradle is nearly flush with the bottom of the box. The needle I use when punching signatures has enough clearance. If someone uses a longer needle or awl and needs more clearance, a folded piece of corrugated board or a couple pieces of heavy felt as a liner should do the trick. It works for me.
I've had this idea in the back of my head for some time. The holiday promotions at Bookbinding Etsy Street Team (BEST) gave me the push to roll this thing out. The box will be discounted for my promotion. Go to BEST blog to see the daily promotions offered by other team members between now and Christmas. My promo date is Sunday, December 21. This box will be greatly reduced on that day if it's not sold before then. It's already listed in my shop.

Sunday, November 30, 2008

honestly

I have been working.

Sunday, April 13, 2008

boxing challenge, round one

This isn't so much a formal challenge as an observation and open invitation. It seems to me that there aren't that many boxes offered in the world of etsy. Etsy is all about trinkets and knick-knacks and to do with all of that?--I say to put them in boxes. So where are the box makers?

Imagine a box for each item on etsy.

Wednesday, March 5, 2008

managing blog consumption

Here is a question to everyone. How do you sort through and review the blogs that you regularly visit? My list of blogs is slowly growing and quickly becoming a cumbersome feat of management. I am currently experimenting with my tried and true RSS Bandit and Sage (thanks Rhonda), a component that works within Mozilla Firefox. These are both basically feed readers that keep track of sites that are published in atom/rss/...formats.

Monday, February 18, 2008

mitered corners


When I learned how to make mitered corners we learned a really involved and contorted way to do it. The corners were perfect, but it was very process intensive. I won't try to describe it. It finally occurred to me that there was a much easier way to do it with identical results. If anything the results are better considering how much less the book has to be handled. Less handling, less mess, fewer accidents. I since ran across this method in print but can't remember where. The sequence of photos are fairly clear. The only critical consideration is to use davey board that is the same thickness as what's being cover. The angle doesn't even have to be a perfect 45 degree angle, and the edges will still meet straight and flush.

Using mitered corners is not a necessity. Folded corners leave more cloth in the corners for wearability. The mitered corner is smoother and less bulky when that matters. The mitered corner is more durable than it may look, because the glue has a chance to impregnate the ends of the cloth fibers locking the edges together, and the end pages have a smooth, flush surface to adhere.

fund-raiser starts today

The Bookbinding Etsy Street Team (BESTbooks) starts an online fund-raiser today. The charity recipient is H.E.L.P. International. Follow and assist the event through the team blog that is linked here. I'll be there along with other book artists you'll want to meet.

Friday, February 15, 2008

sanded edges

Sanding the sides of a book block can be done with as little as a sanding block. For more precision clamping the book block between two boards help to keep the sanding block square and level. The following is how I do it.

The tools (from top to bottom): wood blocks, micro plane, shims, and sanding block. The wood blocks I use are scraps from a canvas stretcher. The micro plane for removing larger amounts of book. Shims for evenly raising wood blocks. Sanding block for sanding edges.


I have several sets of shims of various thicknesses depending on how much paper needs to be removed.


Blocks clamped then inverted in vise of work bench.


Before and after.

Wednesday, February 6, 2008

center finding ruler

I love rulers, but this one holds a special place in my warm little heart. About one half day of heavy use, and my brain was noticeably mushier. It doesn't take much to figure out how to use it. An example if it isn't readily apparent. Say I have two dots four inches apart and want to find the half way point between them. Place the ruler next to the dots so that one dot is left of the zero and the other dot is to the right. Using a bit of intuition move the ruler in the direction that balances the measurements on either side of the zero. In this example the left dot will be on the left 2" line, and the right dot will be on the right 2" line. The zero is the center point! Plus without doing any math the ruler shows that the center is two inches from either dot!! The ruler really earns its keep when it's 0200 in the morning, and the dots are 4 13/73" apart.

This is another one of my tools from the print studio. I used it mostly when setting the registration marks on paper before printing multiple runs. Paper didn't have to be the exact same size, but I always had a perfect center. Now it is stored with the book tools.

Tuesday, January 22, 2008

photo adjustment

For the longest time I was frustrated with images that came out discolored. Especially the white ones. That crispy snow scene or drawing on white paper always ended up gray. This is the one click solution for those who can't or don't want to become involved in more complicated photo manipulation gymnastics.

First, to understand what causes the problem. The camera can only make two adjustments--how long the shutter is open and how wide the aperture opens. Of all the metering and measuring of color and brightness of a particular scene, in the end the camera can only accept one setting for shutter speed and one setting for aperture. It ends up being a game of assumptions and averages. The typical decent photo is assumed to have so much light and dark, which averages a certain amount of gray. To properly replicate this "classic" gray there is one setting for shutter and aperture. The computer in the camera is programmed to calculate the proper setting from its sensor readings of a scene. The game goes awry when a scene is not typical in color or light. In the case of much white, the camera only knows to strive for an average gray, which pushes the white scene into grayness. Light sources cause the same problem. Camera sensors read natural light as cool and light bulb light as warm, but the problem is that the camera doesn't know when it is encountering which kind of light. This is the reason there is daylight and tungsten (light bulb) type films, and digital cameras have settings for inside and outside shooting.

Try to use the camera's adjustments first and use photo editing software for clean up. Most photo programs have an auto adjustment feature, and this feature can solve the majority of problems with one or two clicks. In photoshop I think there is an auto levels, auto color, and auto contrast. In paintshop pro it is called one-step photo fix under the adjustment drop down menu. The above images are a before/after example of one click editing. Image on the top is rather warm because of incandescent lighting. The lower image has been edited and is a closer match to the wood's natural color and canvas backdrop. Now try these simple adjustments on your snow scenes, drawings on white, and objects sitting in front of light colored backdrops.

In a real hurry? Try using the camera's built in flash and see if you can live with the front-on lighting. Colors are usually accurate, because the camera is calibrated to the flash, so it knows what to expect.

Monday, January 14, 2008

library call number

I recently found that I have a library call number. Do a google search for this number:

N7433.4.B535 B66 2005

This is pretty cool. It's sort of permanent. This is a reason I am a strong advocate of participation. Get out and be seen.

Side note. They describe the work as "inaccessible." I lean more towards difficult, but accessible--potential.

cradle

I built this cradle from masonite/hardboard and parts of my mother's fence. This construction is lightweight, but sturdy enough for the work I dedicate to it.

Some of my design considerations. All angles are square, so if I'm setting up a project that needs to be square I don't need to make additional measurements. One side of the cradle is taller than the other so it supports smaller and larger sized projects. Note that the stack of paper in the cradle is only a stack of paper to show how I would clamp a book block in place. There is a 6 inch wide piece of masonite on top of the book block to distribute clamp pressure.

Approximate dimensions: accommodates 12 3/4 inch tall signature, short side 6 inches, tall side 12 inches.

Next cradle will fold into a box for carrying bookbinding tools. And maybe I'll make extra ones to sell in my etsy shop.

tools

left to right. mechanical pencil, x-acto retractable razor knife, stainless mess hall knife, bone folder, steel burnisher, Starrett dividers.

These are tools that are always out when I'm working on books. Sometimes when I'm only drawing I have them out just because I like them so much. Other tools like brushes, needles, and pallet knives have special jobs and come out when needed, but the above tools are always at hand. Of particular note is the dinner knife and burnisher. The knife has a long, unserated cutting edge that is sharp enough to leave a clean cut when going through a folded sheet of paper but isn't so sharp that the cut wanders from the fold in the paper. Find the knife you like, and it will make a permanent move from the kitchen to the toolbox. The steel burnisher is from E.C. Lyons's line of printmaking tools. I use the burnisher when the bone folder is too big for a burnishing job. Nothing beats the burnisher for precise scoring of paper and cardstock. Need to insert a dab of glue into a corner or under a loose edge of fabric--the burnisher gets the job (tiny painting knife might do the glue job better, but it is usually still in the toolbox). Be careful when first using the steel tool on paper and fabric. It is not forgiving. The price of precision.

I prefer to buy a tool once. I consider the higher cost of good tools a professional investment. The saying about getting what you pay is especially true for tools. I stamp or etch my good tools with the statement--stolen from eb.

Saturday, January 12, 2008

sign?


I've heard stories that explain where rainbows come from and where they go. I have never seen an upside down rainbow. What is the significance of this?

I couldn't get a wide enough view to put this phenomenon in relation to anything. The sun is in the direction of the lower right corner of the image.

Wednesday, January 9, 2008

paper tear bar

A good as time as any to talk about the paper tear bar that I use. I have a new shorter version on its way from Takach Press, so I probably have tear bar on the brain. This is my all around favorite tear bar for tearing, drawing, and cutting. When it first arrived a few years back I was a little disappointed, because it seemed a little lightweight compared to the one I used in school. The school tear bar was probably twice as thick with a beveled edge. I like hefty tools. I soon figured out that the secret to the Takach bar is in the folded edge. The cutting edge is ever so slightly lower than the rest of the bar, so as the bar rests on the paper a large part of its weight is concentrated at the tear line. The results are a tear bar that just does not move--even when tearing thin strips of paper.

The only negative I can come up with is something that can be seen in the below photo of the two pieces of torn paper. I made the torn edge on the left with the conventional tear bar. Note the typical "burr" (the reason we tear paper from the back). The Takach tear is on the right. The Takach bar puts so much pressure at the tear line that it leaves a slight footprint next to the paper burr. In the photo what I am calling the footprint looks like a slight shadow next to the burr. Some people may consider this more unsightly than the usual tear. I consider it a reasonable price to pay for the extra stability of the bar. And besides the tear should be on the back of the paper. Book pages don't have back sides, but when it comes to book pages I'm usually folding and cutting paper with a knife, or sanding the edges.


The stability of this tear bar is also useful for cutting binders board, and the raised folds of the bar are a little extra barrier between blade and fingers. The raised folds are perfect for my application of drawing multiple sets of lines. The ridge guides my hand and pencil/pen just a fraction of an inch from the edge of the bar. I have a video I'll post one of these days that shows how I draw the lines.

Post a reply if you have a preferred paper tear bar that you like using. I'm especially interested in finding the source of other quality models out there.

Friday, January 4, 2008

the plan

I made this blog as the sibling to the shop I've set up at etsy. That being said, this doesn't necessarily mean I only plan to cover the topic of books bound by hand which is the current emphasis of the shop. I am versed in other topics as well. And I may be even better at asking questions, so questions will also be within the parameters of the discussion. The disclaimer is this: saying I'm versed in a subject does not necessarily mean I know anything about it. My claim is this: I am an authority on what I have done and seen. Most of the time.

I have no secrets as to how I do things. I will cover processes and ideas as they come up or as others bring them up. Eureka is a common part of my work. The majority of my eurekas may be as simple as finding that something actually works as described in the owners manual or recipe. A eureka is as much a good find, so I am here to endorse and pass along good finds as I run across or remember them.

That is the plan.

In keeping with the plan, I'll go ahead and make my first endorsement. Visit the Bookbinding Etsy Street Team site. Yes, this is about commerce, but this is especially a group of people willing to help one another with advice and ideas. Competitors working hand in hand. It's not a new concept, but its always refreshing to see it in work. You'll find me there too.