Saturday, December 27, 2008

lined paper

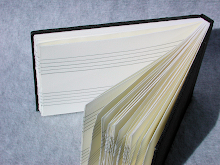
I differentiate books as journals being lined and sketchbooks being unlined. Using this terminology I think there are many sketchbooks that wish they were journals, but lineage was not available. Lined book blocks and paper are available, but that smart handmade paper that you really like is rarely going to be lined. For this reason I have been lining my own paper. I have the option to draw, print, or emboss the lines, and I can decide the color, gauge, and spacing of the lines.

Any printing method works. I have used etching, aquatint, and lithography. I haven't used screen printing or wood/lino cut. One of my favorite results was from a frame wrapped with mono filament fishing line. The fishing line leaves the printed line as well as a light score in the paper.

When drawing lines I set up a template with marks for line spacing. I place a rule at the appropriate mark and follow the straight edge very closely without touching the rule. This is my personal technique for making a very straight line that still has a looser hand drawn feel. I've also projected the lines with a digital projector and traced the lines.
Whether drawing or printing I set up my template or printing plate so that the length of the paper is at least two signatures long. I make the lines on both sides of the paper then tear the sheet at signature length. Picture a toilet paper roll with lines running the length of the sheet and then tear off signatures as required. That is an exaggerated picture. Most of my prints and drawings tear down to give me two signatures. The matchbook size I get four to six signatures.

Sometimes when printing I'll get four signatures from one plate by drawing my plate so that the top and bottom of the plate are the tops of two signatures. The center line of the plate is the bottoms of the signatures. After printing both sides of the sheet, tear once length wise to get two double length signature sheets then tear those down to single signature length. Confusing description I'm sure. Using the image below. Picture it as two plates each large enough to make two signatures. The top plate is right side up and the bottom plate has the signature tops at the bottom. But instead of two separate plates make it one plate to print one large sheet that is then torn down to four pieces.
Hmm, not sure if that's any better. Maybe there is still something usable here.

Thursday, December 25, 2008

printing hardware, improvised

I had a conversation with Meredeth of Yatsu fame from the etsy bookbinding group. The conversation lead to talk about printing and producing lines in a homemade, handmade, self-help fashion. I've spent the last five years around presses and have been making my own lined paper, so maybe now is the time for me to expand on the topic a wee bit.
I'll start with the press. When I hear people lamenting over not having a press, one of my first comments is--Make one. Bookbinding is already about taking the long route to getting a book or journal, so why not dig the hole deeper. Books are about multiples whether it is duplication within the contents of a book or duplication of information between books. The press is also about duplication. So don't let not having a press be an obstacle. I'm mostly speaking to the people who have a print related idea but think they are stuck since they don't have a press.

I won't go too much into using a wooden spoon. I haven't had much luck with the technique (mostly because of my application), but do remember that it is an option.

The mechanics of the press is basically the idea that anything that will exert pressure can be used for printing to some degree of success. The photo in my article about adjusting photographs is a picture of several wood presses that work well for letterpress and block-type printing. Notice the resemblence to clamps?

To cover the actual construction and printing techniques would involve writing a book which is not my objective today. This is a primer. The internet is loaded with homemade printing press plans. All seem to be variations of similar ideas. One of the older how-to-build-an-improvised-press books is a Popular Mechanics book published in the 1960's (I think). I can picture where it was shelved in the universitiy's technical library, but I can't find it in the catalogue. Anyway, the technical library usually has something on improvised presses if the school has some sort of printmaking program. The key to remember is that for etching and litho printing some sort of roller or scraper bar needs to be incorporated into the press to concentrate the necessary pressure to transfer an image. Materials are easily found. Plywood, and standard hardware. The roller can be salvaged or found at tinkerer suppliers like American Science and Surplus (this store is a gem in and of itself).

When I began my quest to build a litho press, some printers told me it was impossible to build something out of wood that would create the required pressure. I remembered seeing one of Gutenberg's original presses, and it was made from wood. Sennefelder, the inventer of lithography, made a suitcase-sized, portable press made from wood. I was looking for a certain look when I built my press, so I used solid maple. If function is the only objective, plywood should work nicely--it's lighter weight too.

Pictured is my press and the resulting print. Everything is wood except for the leather on the scraper bar and the plexiglas for the tympan. The litho stone is local limestone from a landscaping supplier.
A much simpler press can be built much more easily if function is the only concern. I took the extra trouble with this press to prove that it could be done.

Saturday, December 13, 2008

prototype

This series of images should be self explanatory if you begin with the idea of a box for storing supplies and progress to a cradle for everything a cradle is used for. The cradle/box is a prototype, so it is short on embellishments like handles, latches, pulls, and interior dividers. It is one of a kind and the precursor to a series. The construction is masonite and glue with strategically located slots to allow it to do what it does. Dimensions are approximately 3.75 x 11.75 x 9.5 inches closed, and when opened the cradle handles standard 8.5 x 11 sheets folded in half.
Note that the bottom of the cradle is nearly flush with the bottom of the box. The needle I use when punching signatures has enough clearance. If someone uses a longer needle or awl and needs more clearance, a folded piece of corrugated board or a couple pieces of heavy felt as a liner should do the trick. It works for me.
I've had this idea in the back of my head for some time. The holiday promotions at Bookbinding Etsy Street Team (BEST) gave me the push to roll this thing out. The box will be discounted for my promotion. Go to BEST blog to see the daily promotions offered by other team members between now and Christmas. My promo date is Sunday, December 21. This box will be greatly reduced on that day if it's not sold before then. It's already listed in my shop.